Skip to content

www.rolfje.com

Tag: Kawasaki

Pully party

Posted on 2006-04-01 By rolfje No Comments on Pully party

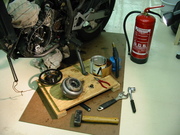
Party today! The rotor puller I ordered last month finally arrived after being in transit for over a MONTH, “thank you” United States Parcel Services! They probably sent somebody to swim accros the ocean with my parcel on his back. Judging by the shipping costs, the swimmer had enough food luxury during his trip. I really hope that Pit Posse selects a different shipping company for international orders soon. I took the torch and heated the rotor until water drops put on it boiled, to soften the retainer (lock tight) between the axle and the rotor. Then I re-tightened the rotor puller, smacked it with a hammer, re-tightened it, and so forth. The fifth hit did it, the rotor popped out. As you can see in the first picture, I had a fire extinguisher close by, because oil and fire do not play well together. I also used gloves so I could grab hot metal parts if needed, and I used aluminum plates to protect the magnet from direct heat of the torch.
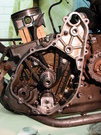
Kawasaki KLR wrenching fanatics will notice the missing balancer chain tensioner (or “doohickey”, as they are sometimes called). Don’t worry, it’s still in one piece, I took it off to straighten it. It was bent and worn by the holding bolt, and I don’t want the bolt to sit or crawl to it’s former spot.

I also checked the valve fittings by putting petroleum in the head. They do not seem to be leaking, and show now signs of abnormal wear. Next week I will be checking the old oil for metal splinters, and putting it all together.

Workshop

Rotten Rotor

Posted on 2006-02-14 By rolfje No Comments on Rotten Rotor

Kawasaki KL 650 Tengai crankshaft drawingLast week I tried to pull the rotor by using a rotor puller, and a socket (from a socket wrench set) to block it. The socket burried it’s way into the first thread of the crankshaft. After realising this, I tried to fit the rotor bolt, and it wouldn’t go in. Since only the first thread was damaged, I carefully drilled it out (only needed to go 2 mm deep), and now the rotor bolt fits nicely again.

Read More “Rotten Rotor” »

Hardware, Workshop

195Nm Victory!

Posted on 2006-02-07 By rolfje No Comments on 195Nm Victory!

Kawasaki Rotor Holder (from workshop manual)For some strange reason, my brother’s Kawasaki KLR Tengai dead-stopped. After starting it again, it made some strange noises. It also had lost a lot of oil somewhere along the way, so we decided to not run it again before we found the cause of the trouble. A few weeks ago we encountered a funny problem, we couldn’t loosen the rotor-bolt. In the Kawasaki KLR workshop manual is a picture of a strange wrench to hold the rotor. Ofcourse we’re cheap, so we wouldn’t spring for a nifty and probably expensive Kawasaki specialty tool for a very old bike which not worth more than the petrol that’s in the tank (okay, okay, but you get the point).

32mm wrench, colored from heatingThe rotor bolt is tightened to 195Nm. That’s a lot of force there, so it’s not surprising we couldn’t loosen it by holding the flywheeel with our hands. So we set out to create a tool of our own. We even ended up trying to bend an old 32mm Chrome-Vanadium wrench, which resulted in an empty gas can, a very hot workbench and nice colors on the wrench, without it bending even the slightest. We we barely able to heat it to the point it got red-hot, because the metal just conducts the heat away from the point you want to heat.

Holding the piston to loosen the rotor-bolt (overview)So I started mailing with Vincent, a good friend of mine which happens to be “quite handy” with motorbikes . He pointed out that you could also stop the rotor from turning by holding the piston. Because we wanted to measure the play in the bigend bearing we needed to remove the sleeve anyway, so I immediately went back to the workshop to do this. After removing the sleeve, I could easily make some wood pegs to block the piston. The wood would have to have a big surface and be strong enough to hould the piston, without damaging the piston or the engine casing.

Holding the piston to loosen the rotor-bolt (detail)It turned out to work great! I needed to attach a long bar to the socket wrench to be able to apply enough force to the bolt, but in the end I got it! In the picture on the left you can see a detail of how the wood blocks are resting on the engine casing. After loosening the bolt, there was absolutely no visible damage to the piston or the engine. Even greater news is that there is also virtually no play on the bigend bearing, so we don’t have to disasemble the crank.

Wearmarks from applying 195Nm to the boltWhen looking at the bolt, the results of applying so much force to the faces of the socket wrench become visible. We know for a fact that this bolt has been removed once before, so these wearmarks are from tightening and loosening the bolt just two times. I think we can tighten it one more time, but after that it needs to be replaced.

Hardware, Workshop
           

Recent Comments

  • rolfje on Methode Buijs uitgelegd
  • LinkedIn is at Peak Enshittifaction – Will Chatham's Blog on Linked-In not really Opt-in?
  • Hans j on 1N4148 diode as RF switch
  • Roaming Rhonda on DLNA on OSX, done right
  • Frans on How to fix a Krups XN2001 Nespresso machine

Tags

Anonimatron Apple backup design DIY DRM eclipse environment Fun gmail google hacking hamradio Hardware helicopter iphone ipod iTunes Java Keynote maven modelling motorcycle music news opinion oracle osx photo photography programming repair review security Software Steve Jobs T-Mobile technology Time Machine Ubuntu usability Utilities vacation windows Workshop

Categories

  • Apple (105)
  • Divorce (1)
  • Electronics (3)
  • Fun (57)
  • Games (7)
  • Hardware (72)
  • Microsoft (18)
  • Racing (14)
  • Software (134)
  • Uncategorized (65)
  • Workshop (20)

Archives

Copyright © 2025 www.rolfje.com.

Powered by PressBook WordPress theme